Unicorn face paint is a magical and playful way to spark joy, especially at birthday parties, festivals, or themed events. It’s colorful, whimsical, and surprisingly simple to create even for beginners. Whether you’re a parent preparing for a child’s party or an artist looking to practice your skills, mastering an easy unicorn face paint design can add a special touch to any occasion. With a few basic supplies and a little creativity, you can paint a stunning unicorn face that captivates children and adults alike.
Why Unicorn Face Paint Is So Popular
Unicorns are beloved mythical creatures that symbolize imagination, fantasy, and beauty. Their association with rainbows, glitter, and sparkles makes them an ideal theme for face painting. Kids especially love unicorn face paint because it allows them to transform into a magical creature, even if only for a few hours. For face painters, it’s a fun and versatile design that can be adapted to suit different face shapes and preferences.
Occasions Perfect for Unicorn Face Painting
- Birthday parties
- School fairs
- Costume events or Halloween
- Themed photo shoots
- Fundraisers or community events
Essential Materials for Unicorn Face Painting
Before you start painting, it’s important to gather all the necessary materials. Using quality supplies ensures that the paint applies smoothly and lasts longer without irritating the skin. Here’s a basic list of items you’ll need:
- Face-safe paint palette (white, pink, blue, purple, and gold recommended)
- Brushes of various sizes
- Sponges for blending
- Glitter (cosmetic-grade)
- Clean water and a towel
- Mirror for the big reveal
Basic Design Elements of a Unicorn Face Paint
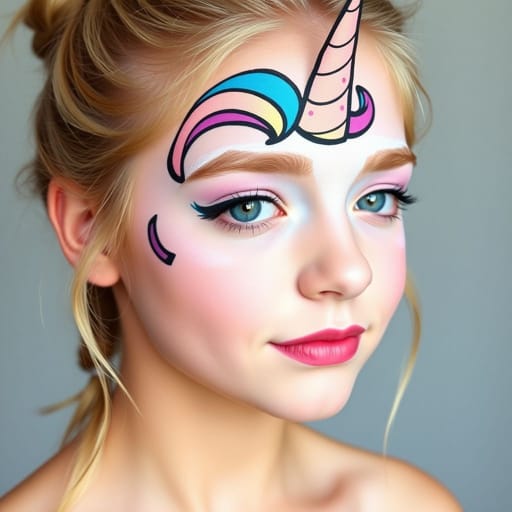
A unicorn face paint look typically includes a few consistent elements: a unicorn horn, ears, and colorful accents such as a rainbow or floral crown. Some designs go full-face, while others focus on just the forehead or one side of the face for quicker application.
Key Features to Include
- Unicorn horn: Centered on the forehead, often gold or silver with shading to add dimension.
- Ears: Drawn above the eyebrows or just beside the horn using soft lines and color blending.
- Floral crown or stars: Added along the hairline or forehead using bright colors and glitter.
- Eyeshadow-like swirls: Around the eyes in matching rainbow or pastel colors to tie the look together.
Step-by-Step Guide to Easy Unicorn Face Paint
Step 1: Base Layer and Preparation
Start with a clean, dry face. Use a damp sponge to apply a light base layer of white or pastel pink across the forehead and upper cheeks. This helps the other colors pop and gives the design a magical glow.
Step 2: Draw the Unicorn Horn
Using a small brush and gold or silver paint, draw a long, thin triangle in the center of the forehead. Add curved horizontal lines to mimic the spiral of a horn. Use darker shades for shadowing and white for highlights.
Step 3: Add Ears and Outline
Next, paint the unicorn’s ears on either side of the horn. These should be teardrop-shaped with a light pink inner section. Use a fine-tip brush to outline the ears and horn with black or dark purple to define the shapes.
Step 4: Rainbow Accents
Use your sponge or flat brush to apply rainbow colors across the upper cheeks or around the eyes. Blend the edges gently so that the colors flow into each other without harsh lines. You can also extend the rainbow above the horn or across the forehead.
Step 5: Add Details and Glitter
Now it’s time to add fun embellishments. Draw stars, hearts, or swirls around the design using white or metallic colors. Add a dusting of cosmetic glitter while the paint is still wet to make the face shimmer. A floral crown effect can also be achieved using a dabbing technique with a round brush and multiple colors.
Step 6: Final Touches
Use a small brush to add highlights on the horn and ears. Check for balance and symmetry. Encourage your model to close their eyes and gently add a sweep of color over the eyelids, if desired. Hand them the mirror for the final reveal and get ready for smiles!
Tips for Success
- Use only face-safe, non-toxic paints designed specifically for skin.
- Keep baby wipes or makeup remover on hand for quick fixes.
- If working with multiple children, use disposable sponges or clean brushes between uses.
- Practice the design on paper or a face chart before the event.
- Let each layer of paint dry before adding the next to prevent smudging.
Variations for Different Skill Levels
Beginner Version
For those just starting, focus on the horn and a few rainbow stripes. This version takes about 5-10 minutes and still captures the unicorn magic.
Intermediate Version
Include ears, stars, and more detailed blending around the eyes. Add floral touches to enhance the visual effect.
Advanced Version
Use fine detailing to add 3D effects, realistic shading, and symmetrical outlines. Include lash lines, glitter gel, and advanced blending techniques for a polished, professional result.
Cleanup and Removal
Once the event is over, remove the unicorn face paint using warm water, gentle soap, and a soft washcloth. Avoid scrubbing too harshly. A bit of coconut oil or baby oil can help loosen glitter and stubborn paint.
Post-Paint Care
- Apply a light moisturizer after cleaning the face to keep skin hydrated.
- Wash all brushes and sponges thoroughly with mild soap and air dry.
- Store paints in a dry, cool place away from direct sunlight.
Unicorn Face Paint as Creative Expression
Face painting is not just about decoration it’s about making people feel special. A unicorn design is perfect for lifting moods, celebrating birthdays, and bringing smiles to faces of all ages. Best of all, with practice and imagination, anyone can learn how to paint a unicorn face beautifully. It’s a skill that blends art, fantasy, and joy in a way few others can match.
Creating an easy unicorn face paint design doesn’t require professional training or expensive tools just a willingness to try and a bit of creative flair. Whether you’re painting one face or many, this enchanting theme never fails to bring excitement and wonder. With the steps and tips outlined above, you’re ready to turn any ordinary afternoon into a magical adventure with a few brush strokes and a lot of heart.