Installing a door stop molding with weatherstrip is a practical and effective way to enhance the comfort, energy efficiency, and longevity of your home. Doors often leave gaps that allow air, dust, moisture, and noise to enter, which can lead to higher energy bills and reduced indoor comfort. By combining a door stop molding with weatherstripping, homeowners can seal these gaps while adding a polished look to the door frame. This solution is not only functional but also relatively easy to install, making it a popular choice for DIY enthusiasts and professional remodelers alike.
What is Door Stop Molding?
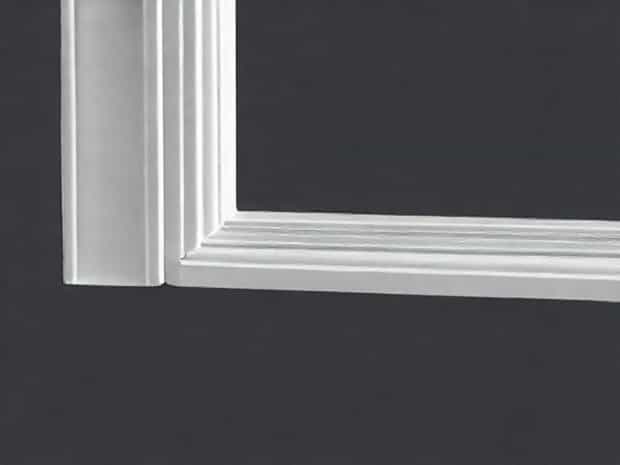
Door stop molding is a type of trim installed along the side of a door frame to create a physical stop for the door. It prevents the door from swinging too far and protects the wall and door edges from damage. Door stop molding can be made from various materials such as wood, MDF, or PVC, and it comes in different profiles and sizes to suit various door types and interior designs.
Functions of Door Stop Molding
- ProtectionPrevents doors from hitting walls, furniture, or other objects.
- StabilityHelps the door align properly within the frame and reduces rattling.
- SealingProvides a surface for attaching weatherstripping to improve insulation.
- Aesthetic AppealCompletes the look of the door frame and adds a decorative touch.
Understanding Weatherstripping
Weatherstripping is a flexible material applied to the edges of doors and windows to seal gaps and prevent the infiltration of air, moisture, dust, and noise. It can be made from foam, rubber, vinyl, or silicone, and is available in various shapes such as strips, gaskets, or V-seals. Weatherstripping works in conjunction with door stop molding to create a tight seal when the door is closed.
Benefits of Weatherstripping
- Energy EfficiencyReduces drafts, helping maintain indoor temperature and lowering heating and cooling costs.
- Noise ReductionMinimizes the transmission of sounds between rooms or from outside.
- Moisture ProtectionPrevents water from entering under doors during rain or cleaning.
- Dust and Pest PreventionBlocks small ptopics and insects from entering through gaps.
Choosing the Right Door Stop Molding with Weatherstrip
Selecting the appropriate door stop molding with weatherstrip is crucial for ensuring proper sealing, durability, and aesthetic appeal. Consider factors such as material, size, profile, and compatibility with your door type.
Materials
- WoodTraditional and decorative, can be painted or stained to match the interior.
- MDFAffordable and easy to work with, but less resistant to moisture.
- PVC or VinylDurable and moisture-resistant, ideal for exterior doors or humid environments.
Weatherstrip Compatibility
When choosing weatherstripping, ensure it fits the door stop molding profile and provides adequate compression for a tight seal. Foam or rubber strips are versatile and easy to install, while silicone or vinyl options offer longer-lasting performance.
Installation Process
Installing door stop molding with weatherstrip requires basic tools and attention to detail. Following proper steps ensures an effective seal and a professional appearance.
Tools and Materials Needed
- Door stop molding
- Weatherstripping material
- Measuring tape and pencil
- Miter saw or hand saw
- Nails, screws, or adhesive (depending on molding type)
- Hammer or drill
- Caulk or wood filler (optional)
Step-by-Step Installation
- Measure the Door FrameMeasure the height and depth of the door frame to cut molding to the correct size.
- Cut the MoldingUse a miter saw to make precise cuts at corners and ends for a clean fit.
- Attach the MoldingNail or screw the molding to the door frame, ensuring it aligns properly and leaves enough space for weatherstrip installation.
- Apply WeatherstrippingCut weatherstrip to length and attach it along the door stop molding using adhesive, nails, or the built-in sticky backing.
- Test the DoorClose the door to check the seal and make adjustments to the weatherstrip if necessary.
- Finish and SealFill any gaps with caulk or wood filler for a polished look and to enhance the seal.
Maintenance and Longevity
Maintaining your door stop molding with weatherstrip ensures long-term performance. Regular inspection and cleaning prevent wear and tear, prolonging the effectiveness of the seal.
Maintenance Tips
- Clean the weatherstrip regularly to remove dust and debris that could reduce sealing efficiency.
- Inspect for cracks, compression loss, or peeling and replace damaged sections promptly.
- Repaint or refinish wood molding periodically to prevent warping or moisture damage.
- Lubricate hinges and moving parts to prevent door misalignment that can compromise the seal.
Advantages of Combining Door Stop Molding with Weatherstrip
Using door stop molding with integrated weatherstrip offers multiple benefits that improve the functionality and comfort of your home.
- Enhanced Energy EfficiencyMinimizes heat loss and reduces utility bills.
- Improved ComfortEliminates drafts, maintaining a more consistent indoor temperature.
- Noise ReductionProvides a buffer against external sounds and vibrations.
- Moisture and Pest ControlPrevents water seepage, dust, and insect entry.
- Decorative FinishCompletes the door frame look while serving a functional purpose.
Door stop molding with weatherstrip is a practical addition to any home, combining aesthetic appeal with functional benefits. It protects walls and doors, enhances energy efficiency, reduces noise, and provides an effective barrier against moisture, dust, and pests. Selecting the right materials, properly installing the molding and weatherstrip, and maintaining it over time ensures optimal performance and long-lasting results. Whether for interior or exterior doors, this simple upgrade can significantly improve comfort and efficiency while adding a polished finish to your home’s interior design.